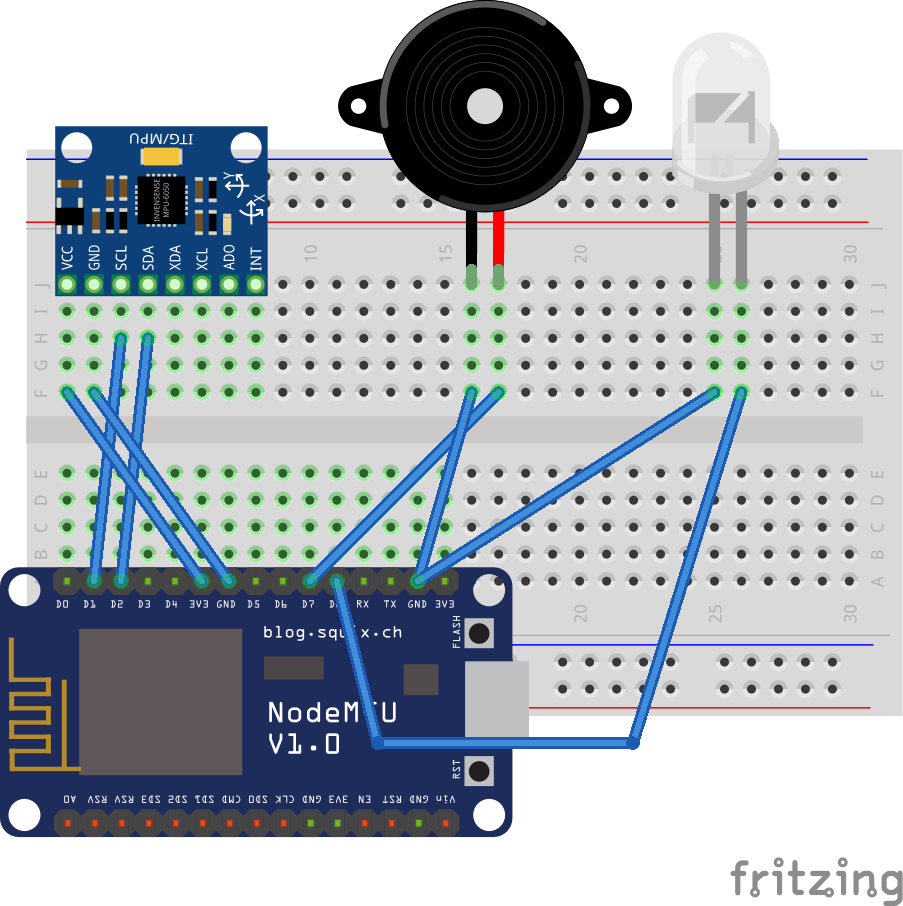
Items needed to build the project: NodeMCU
MPU6050
Buzzer
Led
With the MPU6050 sensor, we can learn the state of an object in space and how much acceleration it changes this state. Using this feature, I wrote a code that makes a sound, lights up and sends an e-mail in case of any jolt.
I used https://ifttt.com/create to send mail. The site allows many algorithms. I have completed the project with webhooks and gmail. Now, after clicking the link above, I will write what should be done: if -> webhooks -> receive the web request -> (we write the name we will use later in the event name, I wrote earthquake) -> then&that -> gmail -> send yourself an email -> ( In the tab that comes before us after giving google permission, we write them in the subject and body sections, just as we want them to be sent to us.

Now we need to learn the information we need to write in our arduino code, for this we click on the webhooks icon that I have shown with arrows in the left picture. When we click on the documentation button in the tab that appears, we see the tab where we will get the information. In the tab that comes up, Link below the line that says Make a POST or GET web request to:(https://maker.ifttt.com/trigger/earthquake/with/key/eevGD4z4bTWnS) we copy, I wrote the link in parentheses as an example, everyone should copy their own link, we will paste this link into our arduino code later.
We did what we needed to do on İfttt site, now it's time to upload our code to our NodeMCU card.
#include <ESP8266WiFi.h>
const char* ssid = "example123"; // wifi name
const char* password = "example123";//wifi password
const char* host = "maker.ifttt.com";
#include <MPU6050.h>
#include <Wire.h>
MPU6050 sensor;
int16_t accelerationX , accelerationY , accelerationZ , GyroX , GyroY , GyroZ;
int16_t basX,basY,basZ,bgx,bgy,bgz;//We will assign the values we get from mpu to these integers
int pfark=150,nfark=-150;//we adjust the sensitivity
//If you want to increase the sensitivity, write these numbers smaller
void setup() {
Serial.begin(115200);//We are using 115200 baud
//If you want to check the values on the serial monitor, make sure it says 115200 baud
WiFi.begin(ssid, password);//we sent the information for wifi
while (WiFi.status() != WL_CONNECTED) {
delay(500);
Serial.print(".");
}//we are connected to wifi
Wire.begin();
sensor.initialize();
pinMode(13,OUTPUT);
pinMode(15, OUTPUT); // we activated the buzzer and led pins
digitalWrite(13, LOW);
digitalWrite(15, LOW); // we cut the voltages of the buzzer and led pins
delay(3000);
sensor.getAcceleration(&basX, &basY, &basZ);
sensor.getRotation(&bgx, &bgy, &bgz);//we got the necessary information from mpu
}
void loop() {
WiFiClient client;
const int httpPort = 80;
if (!client.connect(host, httpPort)) {
Serial.println("connection failed");
return;
}//we checked if we are in contact with the fttt site
sensor.getAcceleration(&ivmeX, &accelerationY, &acceleration);
sensor.getRotation(&GyroX, &GyroY, &GyroZ);//we got the necessary information from mpu again
//sensor.getMotion6(&accelerationX, &accelerationY, &accelerationZ, &GyroX, &GyroY, &GyroZ);
Serial.print("acceleration X = ");
Serial.println(ivmeX);
Serial.print("acceleration Y = ");
Serial.println(accelerationY);
Serial.print("acceleration Z = ");
Serial.println(accelerationZ);
Serial.print("Gyro X = ");
Serial.println(GyroX);
Serial.print("Gyro Y = ");
Serial.println(GyroY);
Serial.print("Gyro Z = ");
Serial.println(GyroZ);
delay(10);
if ( pfark < bgx-GyroX || nfark > bgx-GyroX || pfark < bgy-GyroY || nfark > bgy-GyroY || pfark < bgz-GyroZ || nfark > bgz-GyroZ){
//If the values we measured in the setup are different from the values we measured in the void, we can understand that there is movement or shaking // so if this difference exceeds a certain value (we set 150), we wrote an if command that activates our alarm //
for(int i=0; i<50; i++){
digitalWrite(13,HIGH);
digitalWrite(15,HIGH);
delay(50);
digitalWrite(13,LOW);
digitalWrite(15,LOW);
delay(50);//We turned off and on our led and buzzer 50 times for warning
}
String url = "/trigger/earthquake/json/with/key/eevGD4z4bTWnS";//here we paste the link you copied from the iftt site I mentioned above (write your own tag for the event)
client.print(String("GET ") + url + " HTTP/1.1\r\n" +
"host: " + host + "\r\n" +
"Connection: close\r\n\r\n");//we send mail to ourselves
delay(5000);
}
delay(100);
}
Our code is ready, now we upload this code to our NodeMCU board and our earthquake sensor is READY!!!
After uploading this code to our NodeMCU board, our project should run.
If our circuit is not working as we want, check the following:
We need to make the pin connections correctly and output from the correct pins in our code.
We need to copy and paste the correct link.
Wire.h ESP8266WiFi.h MPU6050.h libraries must be installed.
When we first power up the card (while compiling the card setup), we should not move our card.
Finally, if your wifi name or password contains special characters, nodemcu may not be able to connect to wifi, I suggest you change them and try again.
You can watch the finished project above.


Comments